Skip to content


Cable Management Guide: Sort. Hide. Anchor
Introduction: Why a Clutter-Free Workspace Matters
Take a look at your workspace. Is your home office dominated by a tangled web of wires and stray devices? This isn't just an eyesore. Cluttered desks actively drain your mental energy, diminish your focus, and impact your overall productivity. Beyond aesthetics, excessive cable clutter can accumulate dust, impede airflow, and even pose tripping hazards, making your space less functional and less safe.
At Hexcal, we understand that a truly premium workspace inspires, rather than distracts. It's about achieving a clean, decluttered desk that promotes concentration and reflects a refined setup. That’s why we’ve developed this intuitive, three-step cable management guide: Sort. Hide. Anchor. This powerful method will help you reclaim your workspace, minimize visual noise, and maximize your potential. Let's begin your journey to a truly organized environment with these essential cable management tips.
Here’s a simple three-action system that works.
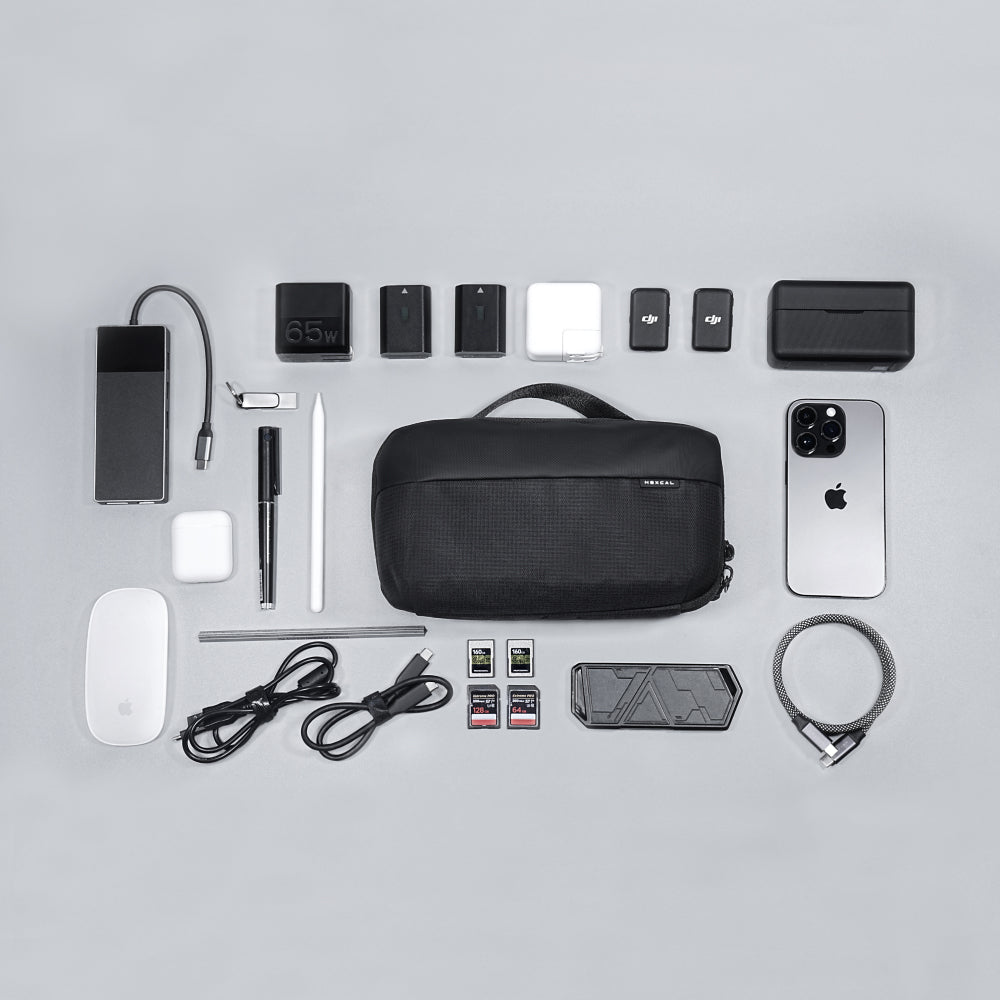
1. Sort — The Foundational First Step: Untangle the Chaos
Before you can build a truly streamlined setup, you need to understand exactly what you're working with. The 'Sort' phase is your critical initial step. It might feel like it gets messier before it gets clean, but this meticulous audit is foundational to lasting order and provides a clear picture of your cabling needs. Think of it as mapping out your personal tech ecosystem.
What to do:
1.1 Unplug everything from your desk setup
Don't just tidy; disconnect. Pull every single cable out of every device. This "clean slate" approach gives you complete control and clarity over each individual connection, revealing the true scope of your tangled wires.
1.2 Lay out all your cables on the floor or a large table
Spread them out so you can see every power brick, every USB-C, every HDMI cord. This visual assessment helps you identify duplicates, outdated cables, and those mysterious wires you can't even remember buying. It's the first step in learning how to sort cables effectively.
1.3 Group them thoughtfully by function or destination
- Power cables: Gather all AC adapters, laptop chargers, monitor power cords, and speaker power cables. These are often the thickest and longest, so understanding their count is key.
- Data cables: Collect all your USB (A,C), HDMI, DisplayPort, Ethernet, and Thunderbolt cables. Consider which devices these connect – your monitor, keyboard, mouse, external drives, webcams, or networking equipment.
- Audio cables: Group headphone cables, speaker wires, and any auxiliary cords.
- Chargers & Accessories: Don't forget smartphone chargers, smartwatch chargers, and any other small accessory cables that tend to multiply.
This systematic grouping is more than just tidying; it helps you understand your connectivity needs and eliminate redundancies.
1.4 Label both ends with masking tape or reusable tags
This simple act of cable labeling is a game-changer. Imagine needing to troubleshoot a connection later – a labeled cable saves immense frustration, allowing you to quickly identify what goes where without pulling everything apart again.
1.5 Declutter ruthlessly: The "Keep or Toss" Rule
Go through each cable and ask yourself: "Have I used this in the last six months?" "Do I have another one that does the same thing?" Toss unused adapters, broken chargers, or duplicate cables. These unused cables are prime contributors to future cable clutter and mental noise.
Tip: Most cable clutter stems from "just-in-case" cables. Be ruthless in your decluttering – only keep what you actively use. This mindful audit provides clarity and sets the stage for an optimized workspace that truly serves your needs, not just stores excess tech.
2.Hide — Make it invisible
With your cables meticulously sorted, the true transformation begins: making the visible mess invisible. This 'Hide' phase is about creating visual serenity and a minimalist cable setup without compromising accessibility or function.
What to do:
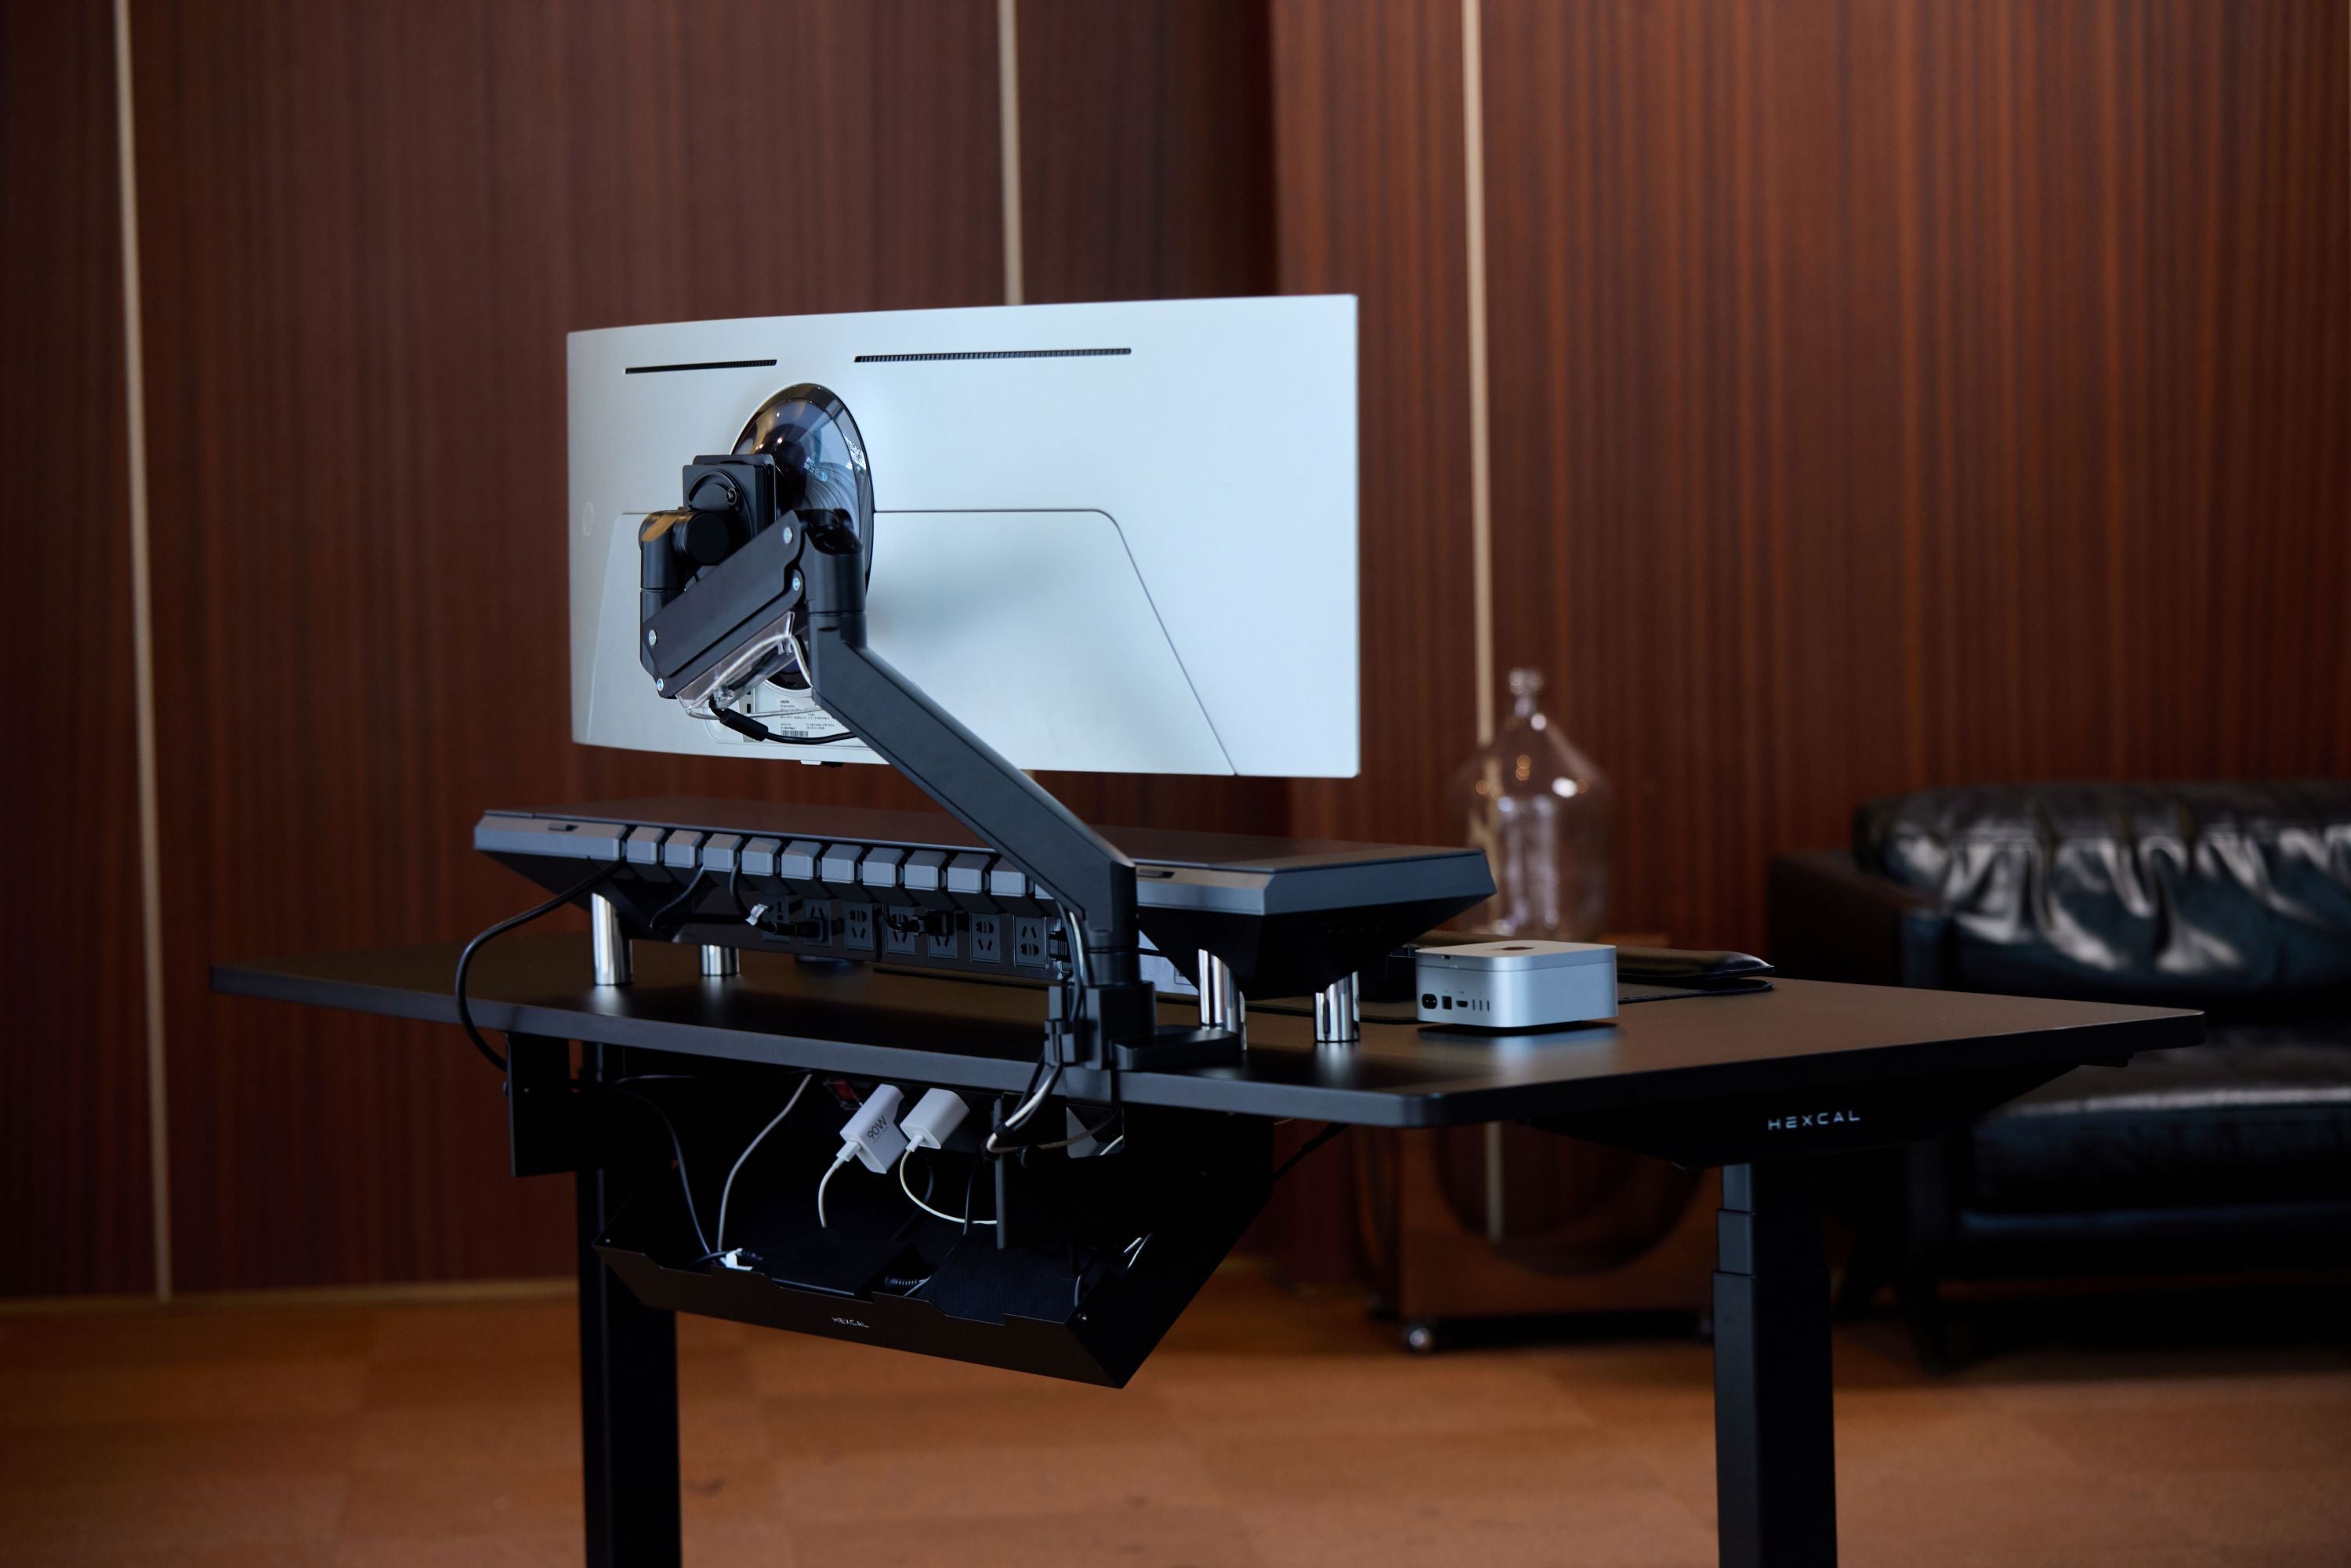
2.1 Start with your desktop: Consider using a monitor riser or a desktop organizer that offers built-in cable channels or hidden compartments. These cable clutter solutions allow you to discreetly run crucial cables (like your monitor's power and display cables) through the back of the unit, transforming cluttered surfaces into pristine, focused zones. Look for options that also centralize power, reducing the number of wires trailing to wall outlets.
Example: Products like Hexcal Studio combine cable routing, power access, and visual clutter control — all in one clean platform.
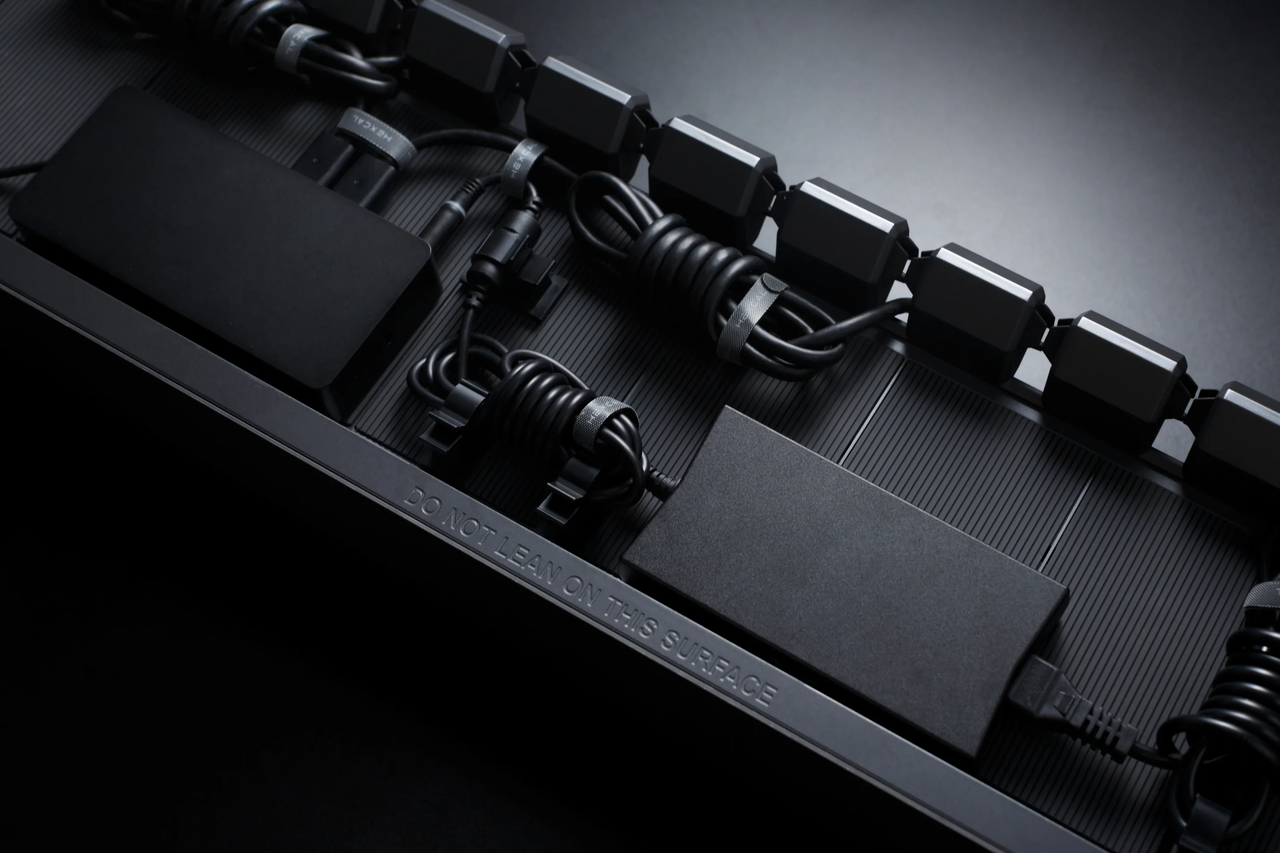
2.2 Mount a cable tray or rack under your desk: For a truly clean aesthetic, effective under desk cable management is paramount. Install a sturdy wire management for desks solution like a cable management tray or similar rack to discreetly hold your power strips, bulky adapters, and bundled excess cable lengths. A dedicated under-desk solution is a game-changer for clear floor space and a polished look. This is crucial for standing desk cable management, as it ensures cables move seamlessly with your desk's height adjustments, preventing snags and maintaining an uninterrupted look whether sitting or standing. It also keeps cords off the floor, out of sight, and reduces trip hazards, while improving airflow and reducing dust accumulation around your electronics.
2.3 Mount your power strip:
- Option A (Recommended): Secure it inside your cable management tray, if there's enough space and ventilation.
- Option B: Stick or screw it directly under the desk, near the rear edge. This keeps it accessible for plug-ins, but hidden from view, contributing to a truly clean desk setup.
2.4 Use reusable straps to bundle excess cable length: Now that your cables are sorted, it's time to strategically bundle them into neat, manageable pathways. Utilize reusable straps, such as Velcro ties, to secure excess cable length. The key here is to focus on creating clean, intentional cable runs: Group cables that will travel in the same direction—for example, all wires heading towards the left side of your desk, or those descending directly to your power strip.
2.5 Wrap cables running down desk legs with a sleeve or spiral wrap: This creates a single, clean visual line – like a tidy cable “pipe” – that significantly improves aesthetics. It also protects cables from dust and wear, contributing to aesthetic desk organization.
Tip: The goal is to hide the mess, not the functionality. Every connection should remain easily accessible and intuitive. Effective wire management for desks should enhance your workflow and the visual appeal of your workspace, not hinder it.
3. Anchor — Keep things in place
The final piece of the puzzle is 'Anchor' – ensuring daily usability and preventing those essential cables and devices from slipping, tangling, or getting lost. This step transforms temporary tidiness into lasting order and effortless functionality, minimizing daily frustrations and distractions.
What to do:
3.1 Use cable clips to fix your most-used wires:
Strategically placed, durable cable clips for desk edges, monitor backs, or within drawers are perfect for securing frequently used wires like charging cables, USB-A/C lines, and audio cables. This prevents them from slipping off your desk or getting tangled underfoot.
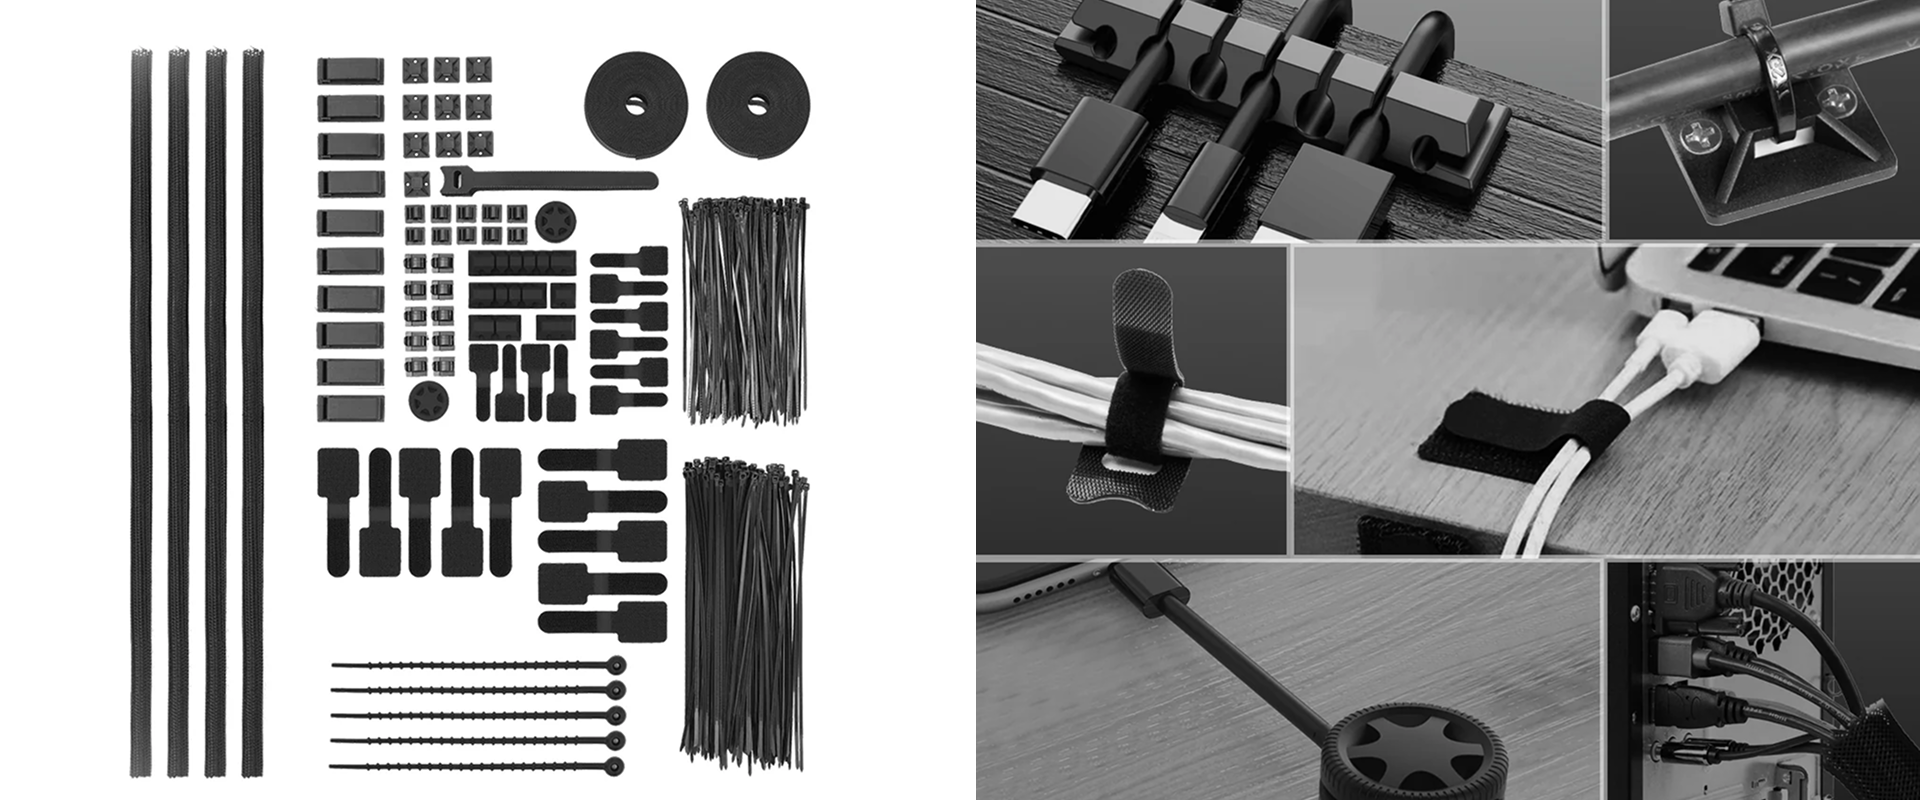
3.2 Install a magnetic cable holder:
Great for holding cables that you plug/unplug frequently (e.g., laptop charger, headphones). Mount it on a metal surface or with adhesive to keep cables poised and ready for use. These are among the best cable management tools for convenience.

3.3 Mount your USB hub or docking station:
Free up valuable desktop real estate by mounting your USB hub or docking station discreetly under your desk or behind your monitor. This keeps your desktop clear while maintaining seamless connectivity.
3.4 Use adhesive pads or brackets to secure small devices:
External SSDs, dongles, and power adapters can be secured to the underside of your desk or inside a cable management tray using adhesive pads or small brackets. This further streamlines your setup.
Daily Benefit: Anchored cables mean no more hunting for chargers on the floor or wrestling with tangled wires. Your essential tools are always precisely where you need them, enabling uninterrupted focus and flow, making your workspace organization truly effortless day after day.
Recap: Minimal Cable Management = 3 Actions
| Action |
What does it means
|
Why does it helps |
| Sort |
Unplug, group, label, declutter
|
Gives you full control and clarity over your connections |
| Hide |
Use trays, straps, sleeves, integrated solutions
|
Makes your setup visually clean, uncluttered, and professional Makes your setup visually clean |
| Anchor |
Fix cables in place with clips, holders, mounts
|
Keeps things neat, accessible, and prevents daily frustrations |
Final Thoughts: Elevate Your Workspace, Elevate Your Focus
You don’t need a drawer full of expensive gadgets or a custom-built desk to manage cables like a pro. What you need is a methodical approach, and the right tools that simplify the process. Minimalism happens through simple, effective systems – and this one starts with three words: Sort. Hide. Anchor.
By applying this simple cable management system, you’re not just tidying up; you’re investing in a more productive, more serene, and ultimately more enjoyable workspace. Achieving a minimalist cable setup has never been easier or more elegant when you apply these principles and integrate the best cable management tools for your needs. This system is designed for adaptability, ensuring your wire management for desks remains pristine even as your setup evolves.
Transform your home office from a tangled mess into a testament of order and efficiency. Elevate your workspace, and you'll naturally elevate your focus.
FAQ
Cable management refers to the systematic organization and securing of electrical and data cables. Its purpose is to enhance the safety, efficiency, and aesthetics of your workspace by preventing tangles, reducing clutter, and creating a cleaner environment.
Proper cable management typically involves a three-step approach: First, Sort your cables by type and purpose. Second, Hide them using solutions like under-desk trays, sleeves, or channels. Third, Anchor essential cables with clips or magnetic holders to keep them accessible and prevent them from falling.
The "best" cable management solution depends on your specific setup, but generally involves a combination of quality tools like under-desk cable trays, cable ties (Velcro is often preferred), cable sleeves, and adhesive clips. For a truly organized and premium workspace, integrated solutions found in high-end desk accessories and monitor arms are highly effective.
Yes, effective cable management significantly improves productivity. A decluttered and organized workspace minimizes visual distractions, allowing for greater focus and mental clarity. It also simplifies access to ports and devices, saving time and reducing frustration.
Effective cable management dramatically transforms workspace aesthetics by eliminating messy wires and visual clutter. This creates a clean, minimalist, and professional environment that not only looks appealing but also promotes a sense of calm and order, aligning with a premium workspace design philosophy.